Mastering royal icing consistencies is arguably the hardest part about working with royal icing. Well, that and all the things that can go wrong with the icing, but that’s another post. This post is dedicated to all things royal icing consistencies in a short(ish) and digestible manner.
If you haven’t checked out my main post on my royal icing recipe (with a TON of FAQs on every question possible), I’d suggest starting there!

*DISCLOSURE: This post contains affiliate links which means that, at no additional cost to you, I may earn a small commission if you make a purchase from one of my links. I greatly appreciate your support!
Post Directory
(click on a section to skip to it)
- What do I mean by “consistency”?
- My 7 main consistencies
- Is there a different recipe for each consistency?
- How do I determine each consistency?
- Piping Consistencies
- Flood Consistencies
- 1 vs. 2 Consistency Outline & Flood
- FAQs
What do I mean by “consistency”?
One of the most unique elements of royal icing is that it can achieve a wide range of consistencies, i.e. different thicknesses. This is how you can achieve a totally flat surface (with a flood consistency) or stiff flowers (piping consistency).
There are two main types of consistency: piping (thicker/holds its shape) and flood (thinner/can settle out to dry flat). Within these types, there is a wide range of consistencies.
The above video shows all of the different consistencies in action, as well as the nitty gritty on how to test for each consistency. Highly recommend watching the video!
My 7 main consistencies
I’ll go into much more detail later on in this post about each consistency, but for now let’s quickly walk through the uses for my 7 main consistencies (3 piping and 4 flood).
Stiff Peak Piping Consistency: used for elements that really need to hold a stiff shape, like flowers/leaves and sometimes pie curst (although you can use medium peak for that). This is very rarely used due to how thick it is and hard on your hands.
Medium Peak Piping Consistency: for piping elements that need to hold a moderate amount of shape like scales on a fish/mermaid, sweater technique, cable knit, etc.
Soft Peak Piping Consistency: most common use is for outlining, detail piping and lettering. This is a hybrid consistency that’s stiff enough to pipe, but can also settle flat in small areas with assistance.
Extra Thick Flood Consistency: used to flood mini cookies and small detail areas.
Thick Flood Consistency: my “1 consistency outline and flood” consistency.
Thin Flood Consistency: my “2 consistency outline and flood” consistency.
Extra Thin Flood Consistency: used for a 2 consistency outline and flood when there is a lot of complex wet on wet in the designs (the thinner the icing, the longer you have to work with it before it crusts).
Is there a different recipe for each consistency?
Nope! The way you make royal icing is to mix the icing to a stiff or medium peak (the thickest you’ll need) and then thin with water from there. There is NO such thing as a perfect recipe for piping or flood consistency.
My icing recipe has a range of liquid required because it depends on your environment how much liquid you’ll need to achieve the same consistency on any given day. If it is humid, you’ll need less, or if it’s really dry, you’ll need more.
How do I determine each consistency?
In some ways measuring for royal icing consistencies is standardized across the industry, and in some ways, it’s not. I learned from the masters more than 10 years ago and I have since come up with methods that work better for me and I think are more accurate.
The YouTube video above is 23 minutes just on me going from the thickest to thinnest consistencies (I also have a YouTube video on the base royal icing recipe).
How to measure piping consistencies
Piping consistencies are more straightforward and standardized in the industry: it’s all about how the icing stands up (or doesn’t) at the top of a spoonful or spatula of icing.
How to measure flood consistencies
Probably the most common method for measuring flood consistency is called the “seconds” method. Simply, this is the number of seconds it takes for a flood consistency to settle. A 10 second flood is going to settle quite quickly and therefore be a thinner flood. A 20 second flood, however, is going to take longer to settle and will be a thicker flood.
When I first started cookie decorating, this is the method that I used. However, since I’ve been decorating longer I have developed my own methods for testing flood consistencies. Given that, unfortunately I give guidance on how many seconds my different floods are.
Jump to top of page / post directory
Piping Consistencies
Without further adieu, let’s get into more detail about the different piping and flood consistencies (going from thickest to thinnest). Please note that while the types of piping consistencies are standardized (stiff, medium and soft peak piping consistencies), I’ve come up with my own names/iterations of the different floods that I use (and so do many other cookiers).
Generally speaking, piping consistencies are the thicker consistencies that hold their shape.
Stiff Peak Piping Consistency
Use: flowers, any detail work that needs to hold stiff shape (used sparingly since it can be hard on your hands)
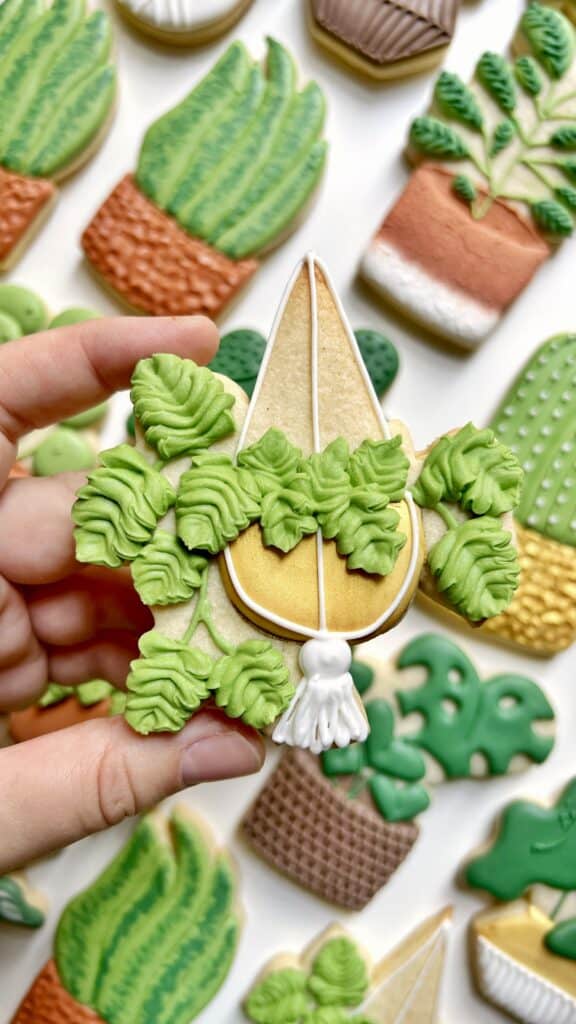
In the photos above, stiff peak uses are:
- Plant: leaves
- Pie: whipped cream
- Pie: crust
Visual measuring cue: icing peaks stand up straight / there is clear definition & texture
Medium Peak Piping Consistency
Use: outline, detail piping that needs to maintain shape (e.g. fish/mermaid scales, sweater technique), brush embroidery
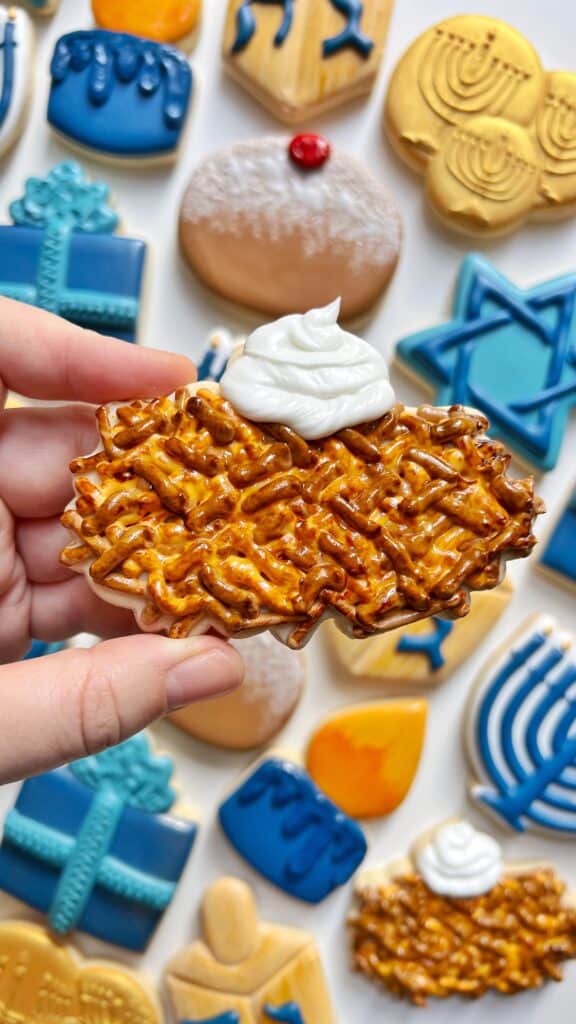

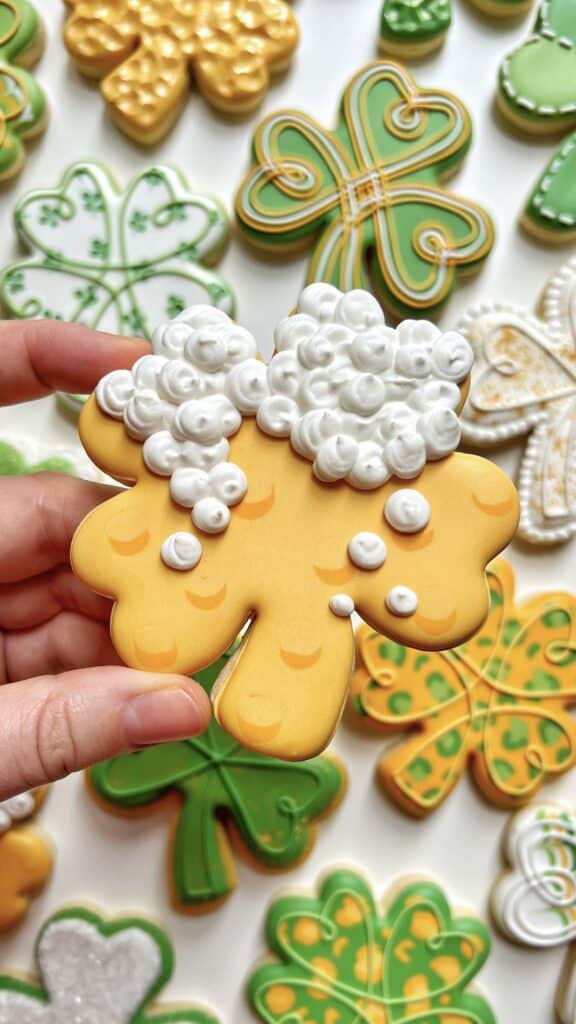
In the photos above, medium peak uses are:
- Latke: potato sticks
- Ornament: cable knit
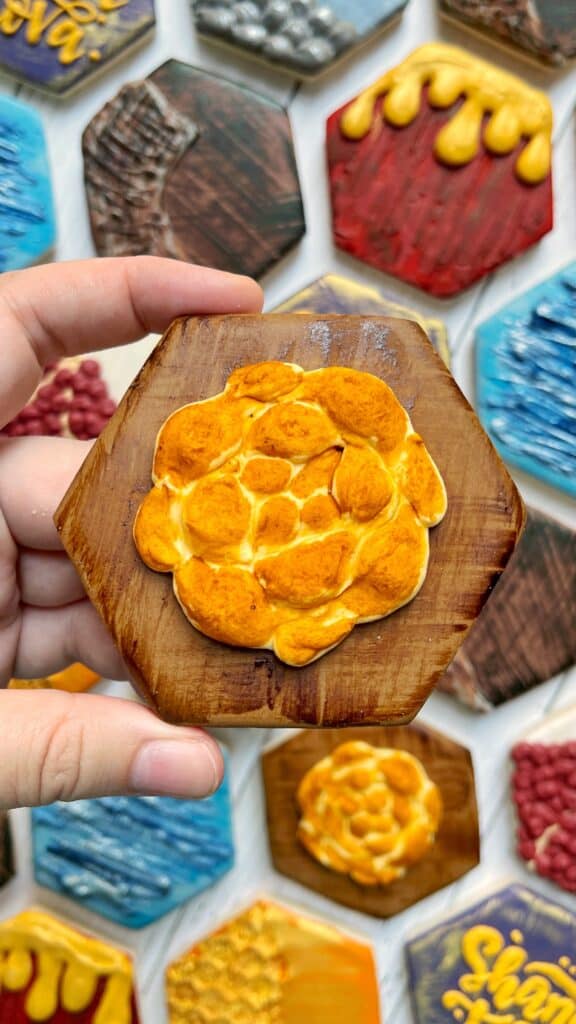
- Clover: beer foam

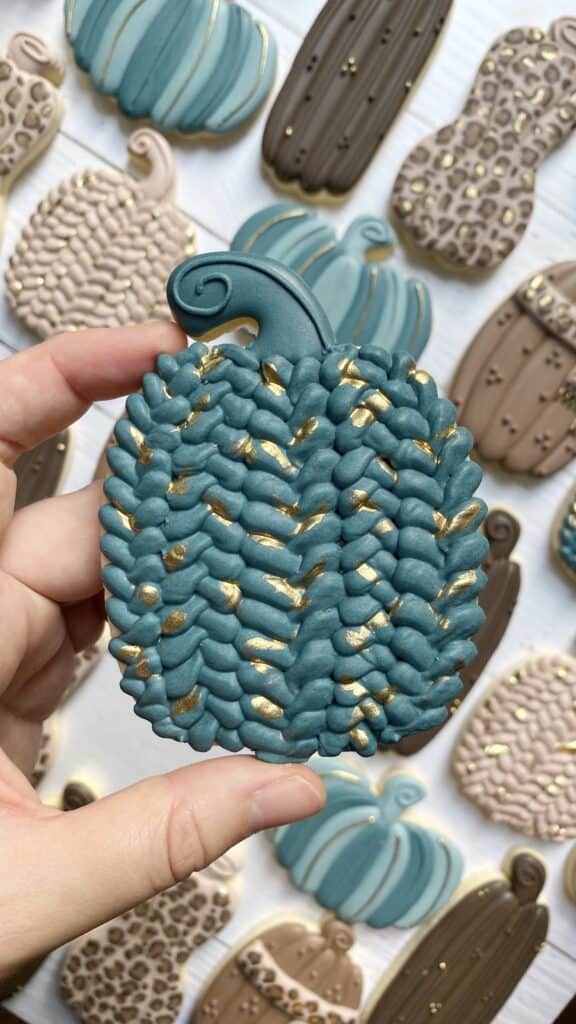

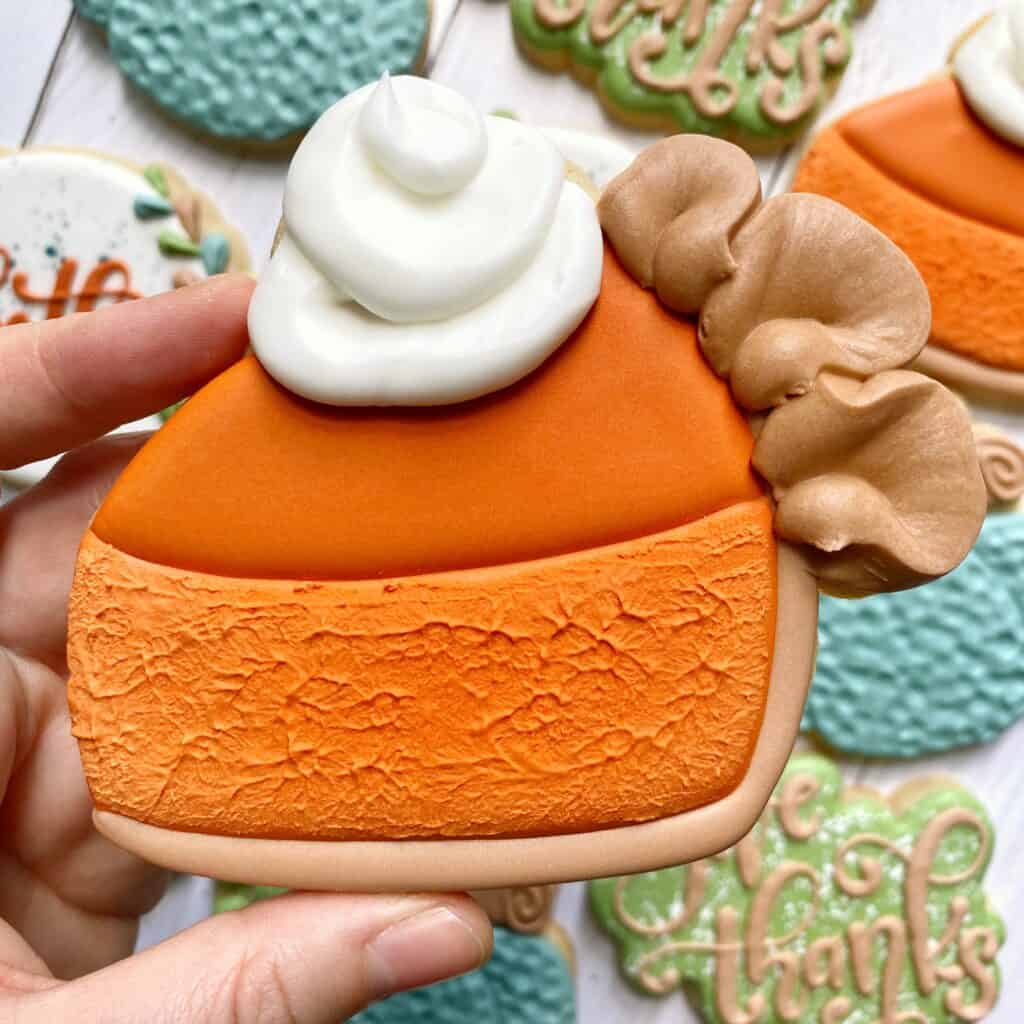
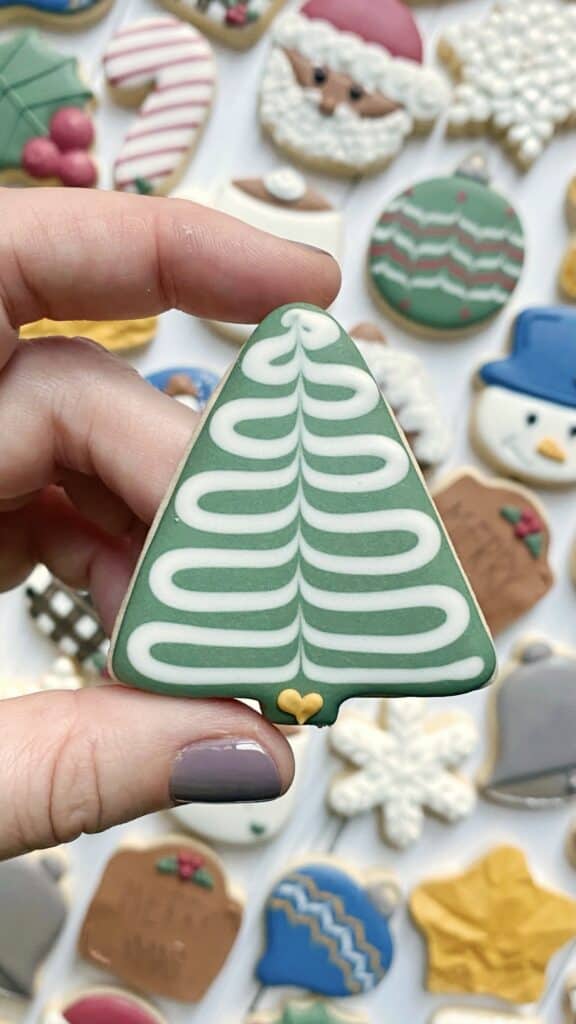
In the photos above, medium peak uses are:
- Pie: crust and whipped cream
- Pumpkin: knit technique
- Tree: all of the icing
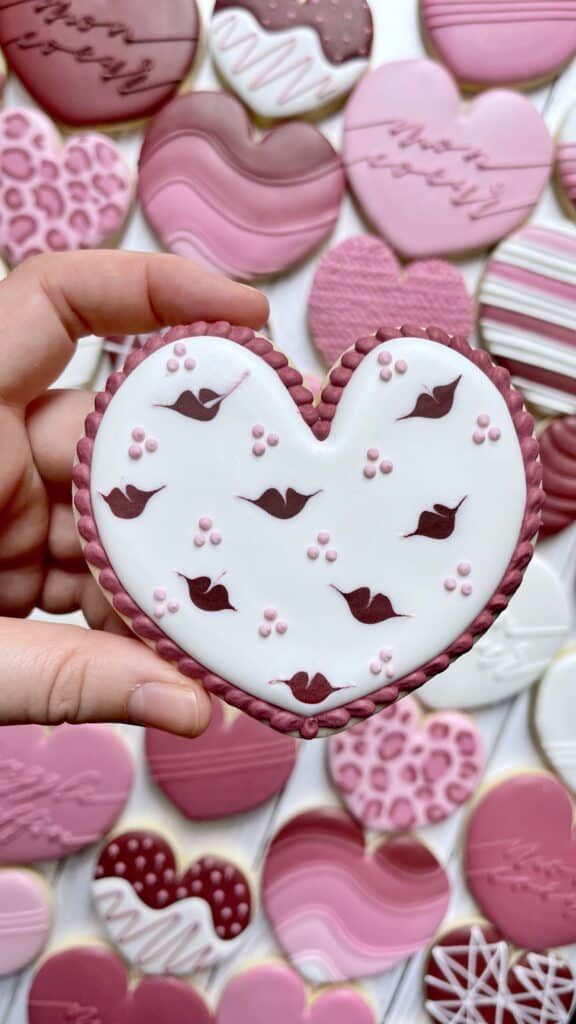

In the photos above, medium peak uses are:
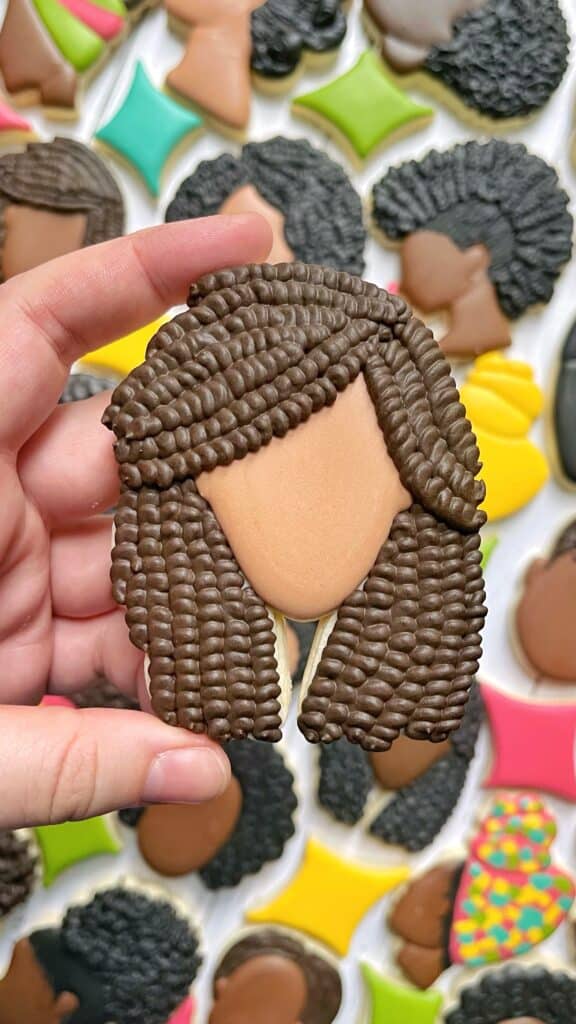
- Heart: beaded border
- Face: locs hair texture
- Tree: brush embroidery

In the photos above, medium peak uses are:
- Hexagon: the challah part
- Watermelon: all of the icing
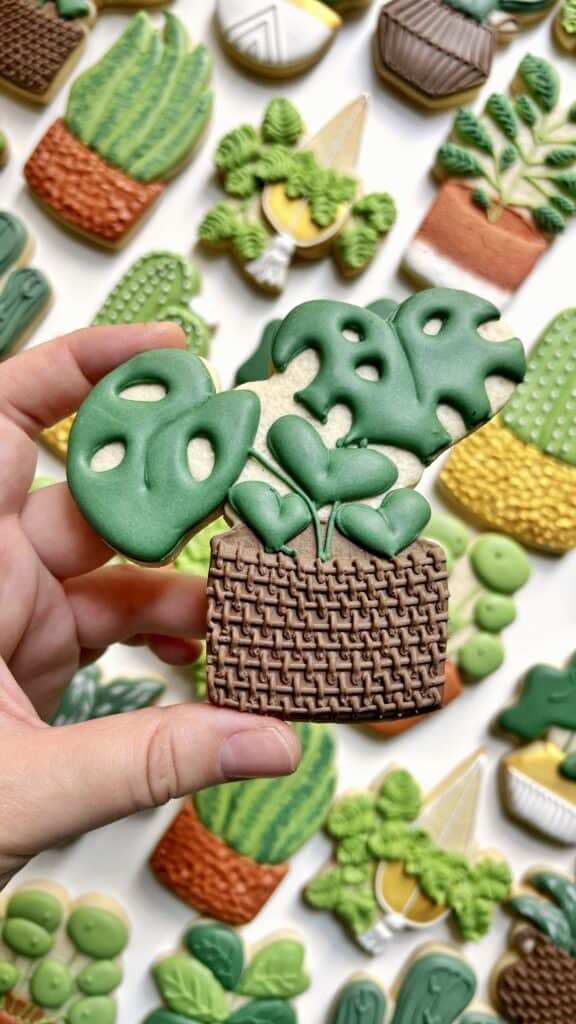
- Monstera plant: basket weave

Visual measuring cue: icing peaks slightly bend over, icing texture is smoother
Soft Peak Piping Consistency
Use: outline, lettering, detail, line work


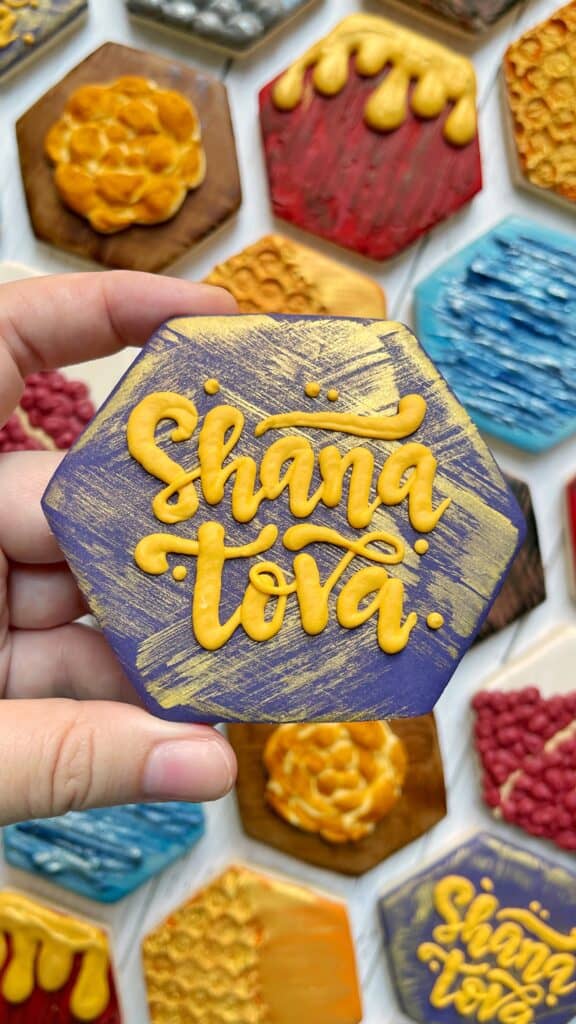
In the photos above, soft peak uses are: lettering on all three cookies.

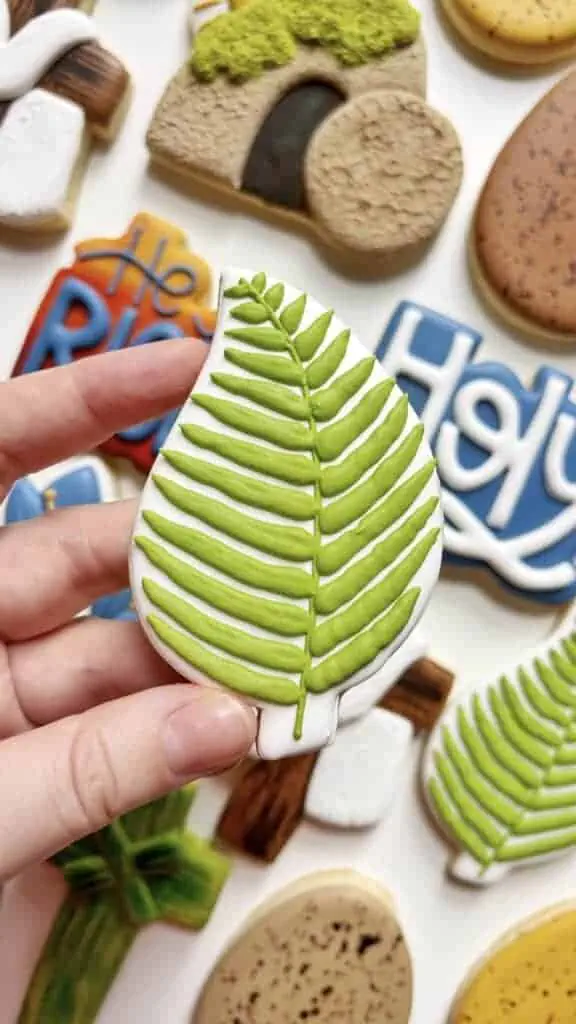
In the photos above, soft peak uses are:
- Letter on the first two
- Palm: leaves


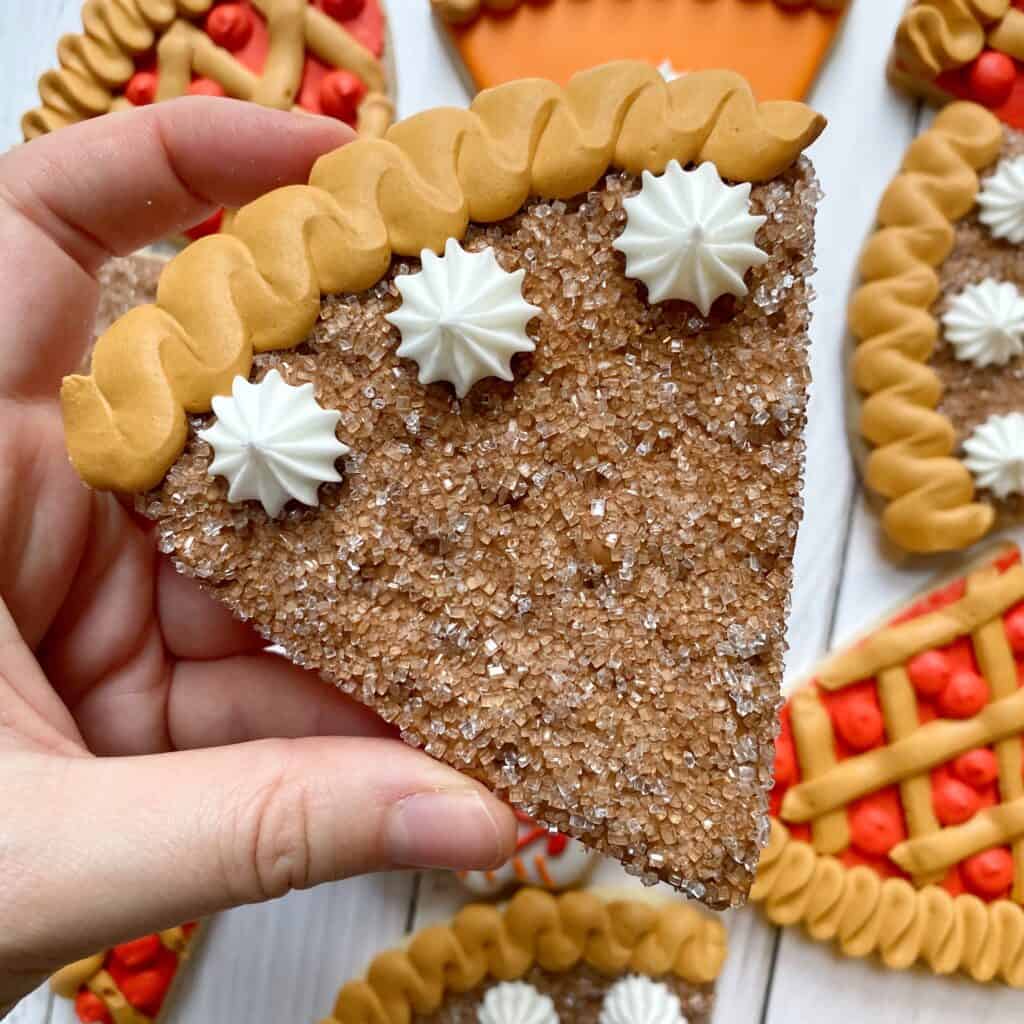
In the photos above, soft peak uses are:
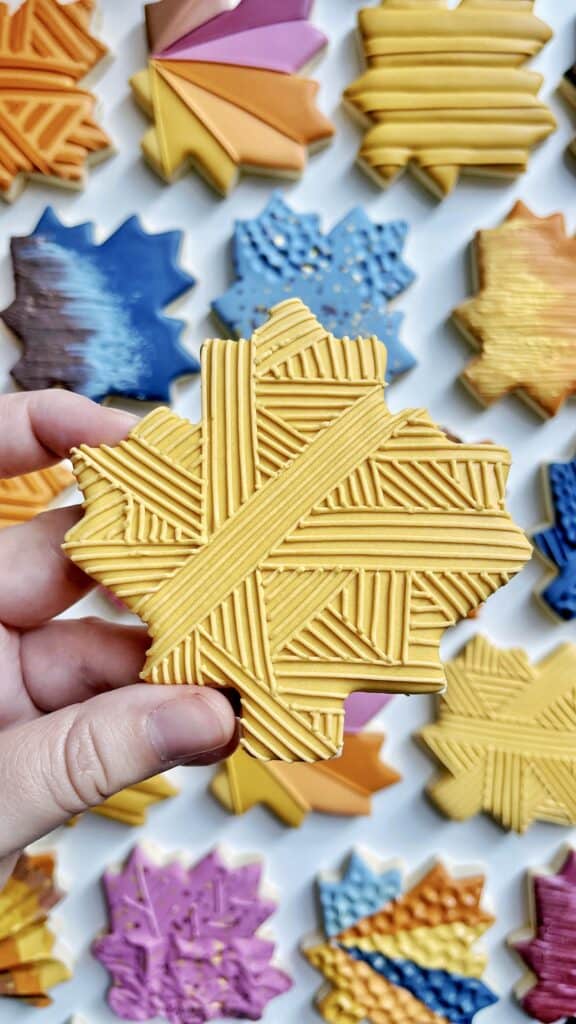
- Maple leaf: lines
- Eggs: lines and dots
- Snowflake: lines and dots (do not recommend medium peak when covering in sprinkles because it dries too quickly)


In the photos above, soft peak uses are:
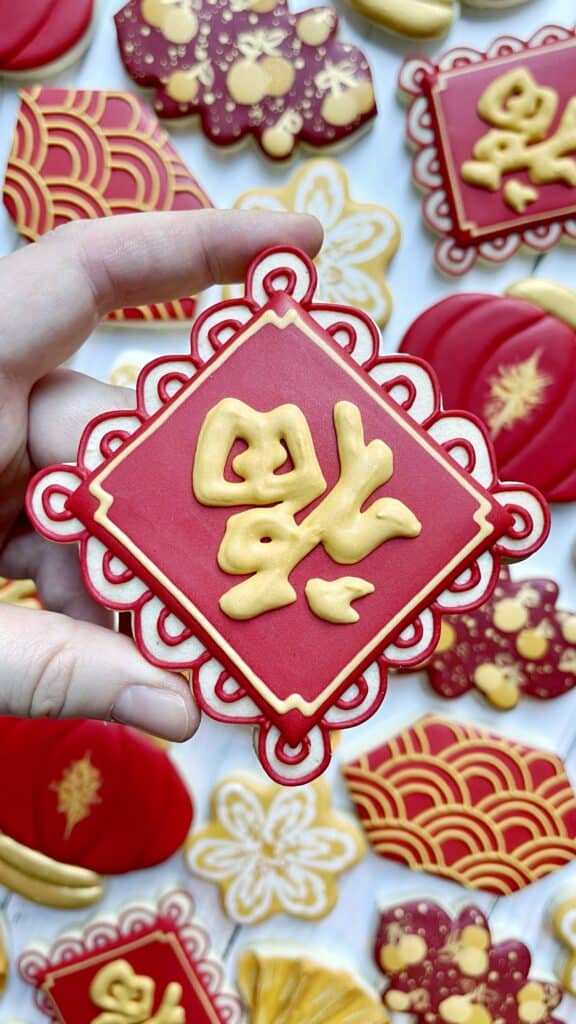
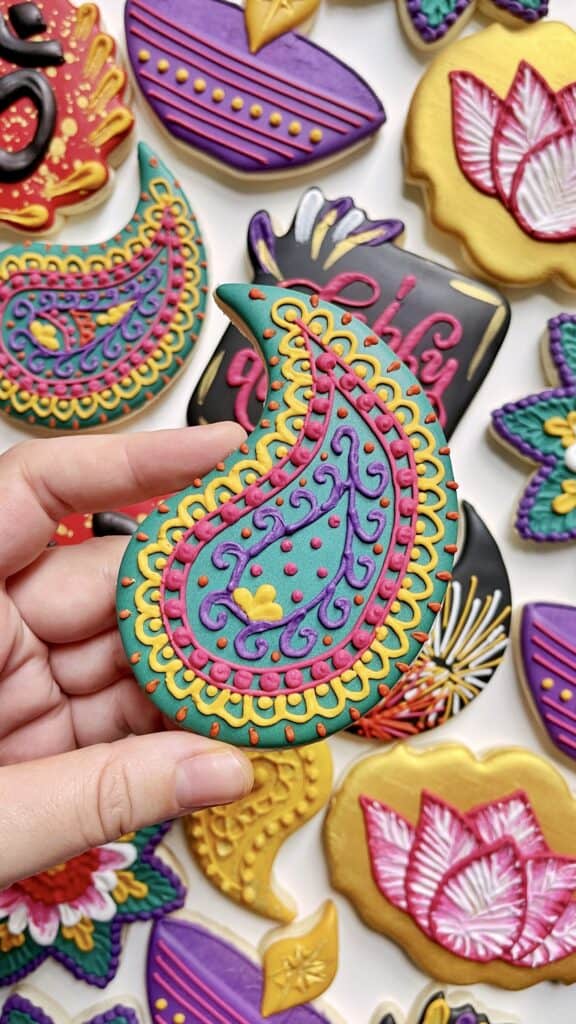
- Paisley: all lines and dots
- Clover: lines
- Popsicle: dots/”balloons”


In the photos above, soft peak uses are:
- Penguin: bow (royal icing transfer)
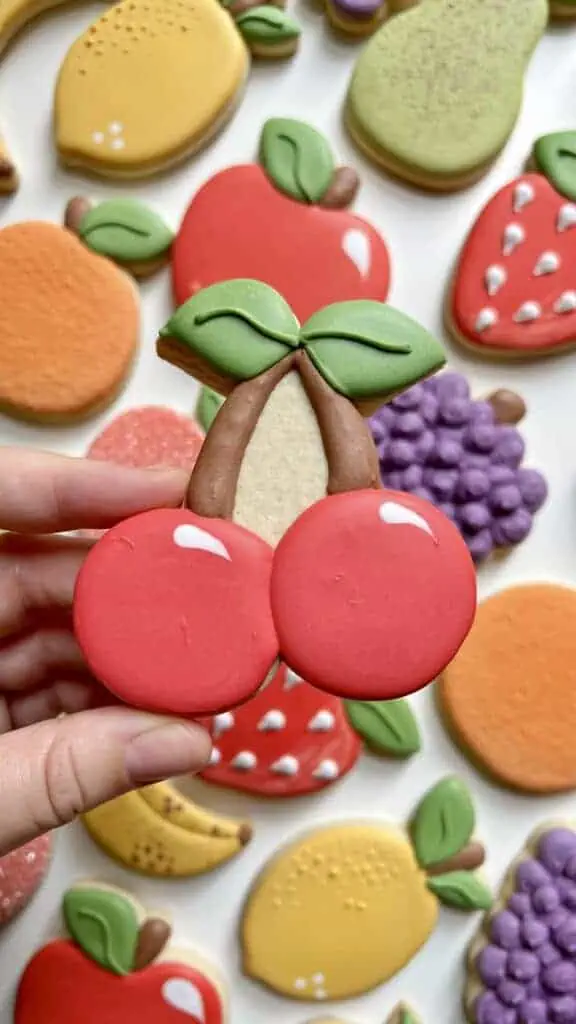
- Pumpkin: green leaves (pressure piped “flood”)
- Cheries: brown stems (pressure piped “flood”)

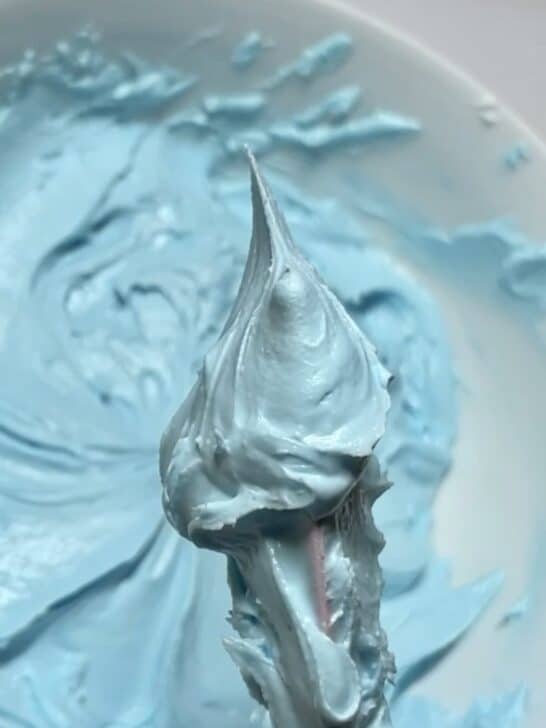
Visual measuring cue: icing peaks completely bend over but still maintain shape (just barely), icing is completely smooth and can settle flat when encourage, almost looks like “warm toothpaste”.
Flood Consistencies
Generally speaking, flood consistencies are the thinner consistencies that will settle flat (either on their own or with help). Of the below, I mostly just use the thick flood and thin flood, but thought it important to add in the extra thick flood and extra thin floods since they do serve different purposes for me.
Extra Thick Flood Consistency
Use: outline/flood for mini cookies
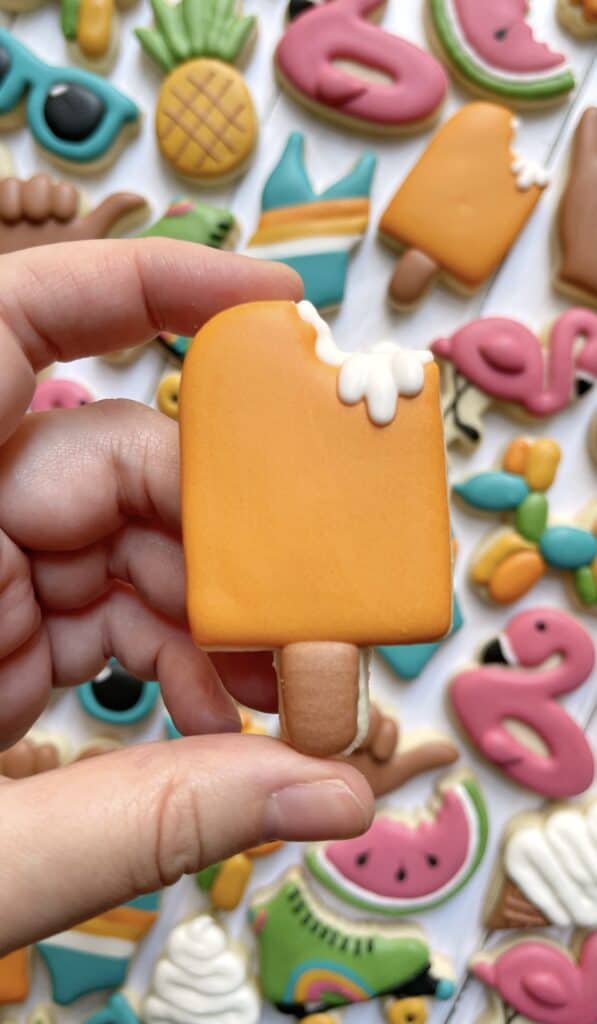
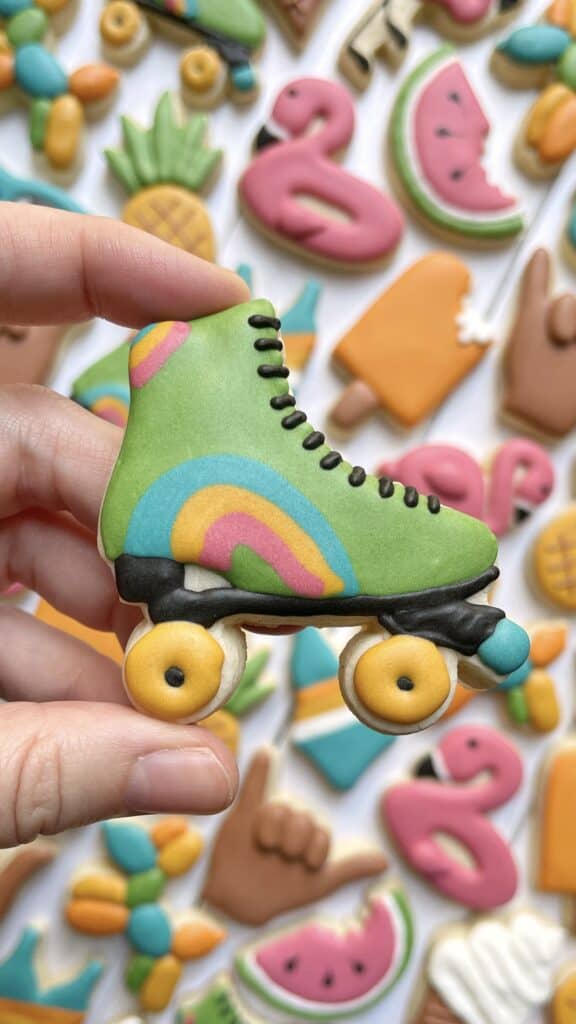
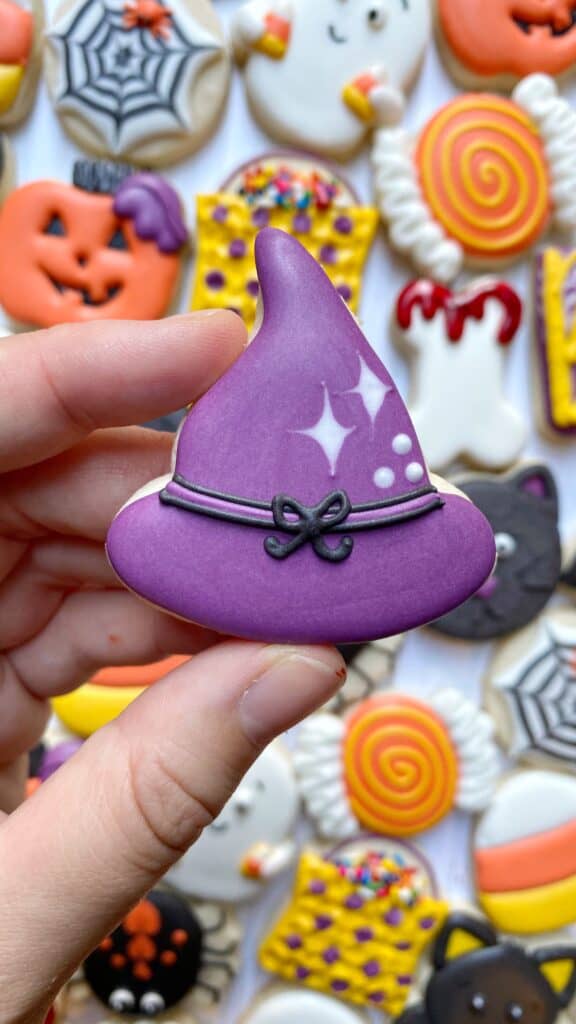
In the photos above, extra thick flood uses are:
- Popsicle: everything
- Roller skates: everything except the black
- Witch hate: purple flood with white wet on wet
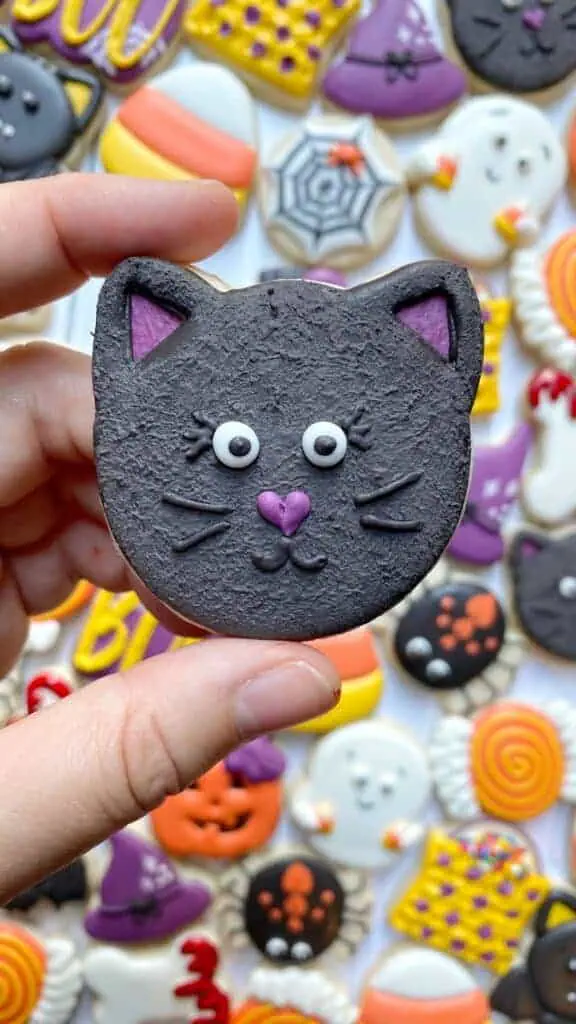

In the photos above, extra thick flood uses are:
- Black cat: base flood and bear technique (you can use any consistency for the bear technique)
- Cranberries: cranberries and leaves (none of the line work)
- Christmas tree: green flood and white wet on wet

Visual measuring cue: easily plops off the spoon by itself (does not run off the spoon)
Thick Flood Consistency
Use: one consistency outline & flood and for flooding smaller areas that are likely to crater

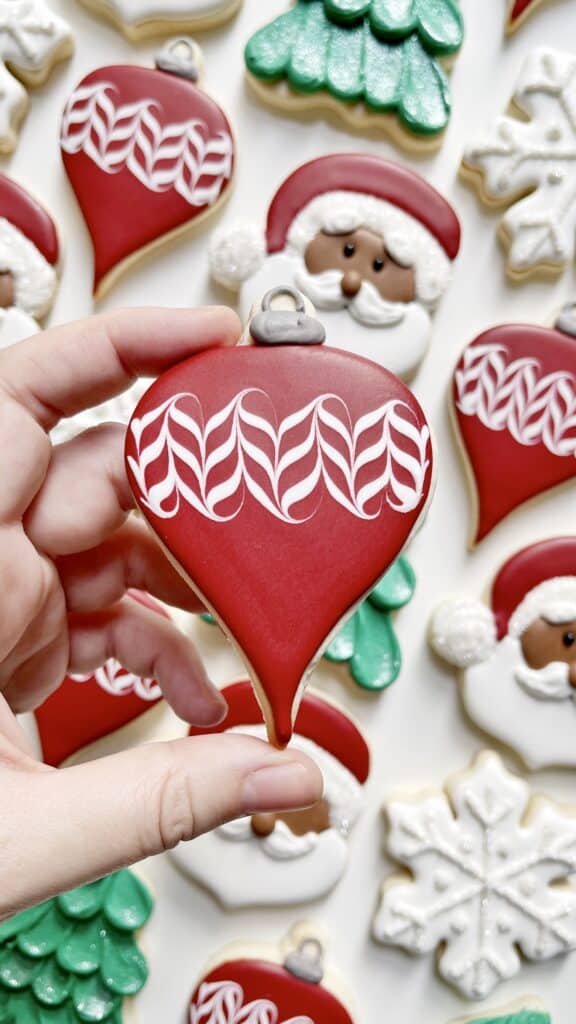

In the photos above, thick flood uses are:
- Mug: just the main part of the mug (hand is a soft peak pressure piped flood)
- Ornament: red flood and white wet on wet
- Scrubs: everything in teal (not the black)


In the photos above, thick flood uses are:
- Face: everything (hair and face)
- Eggs and bacon: everything
- Heart: flood (outlined with soft peak piping consistency)

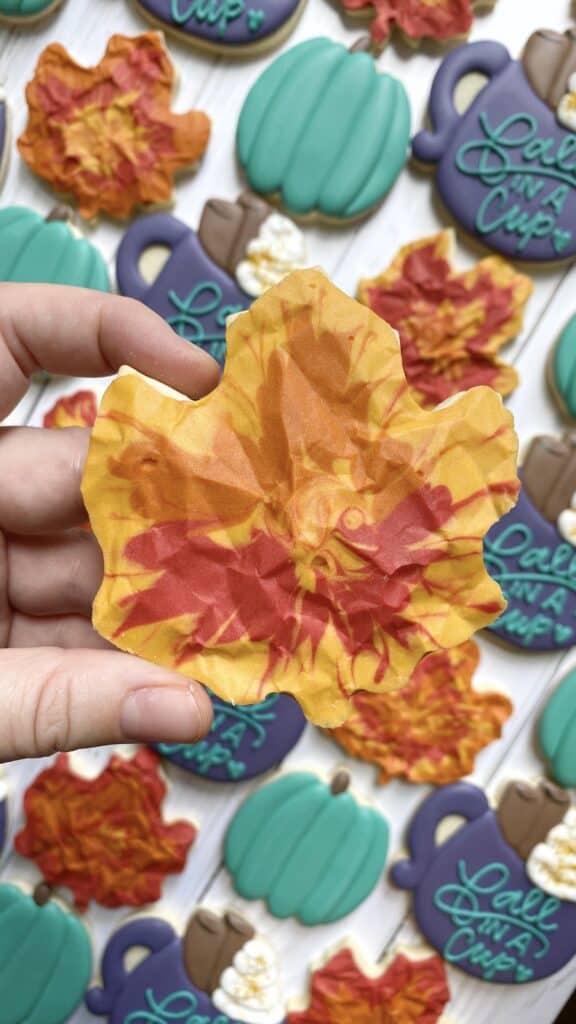

In the photos above, thick flood uses are:
- Santa: beard (not mustache) and red portion
- Maple leaf: everything
- Bouquet: flood portion of the flowers (not the green or the detail piping on top of the flowers)


In the photos above, thick flood uses are:
Everything! Except for the black on the horse’s eyes. All of these cookies are from my online beginner cookie decorating classes, where I prioritize using just my thick flood consistency (with the rare exception, like the horse).

Visual measuring cue: just barely runs off the spoon (usually an inconsistent trickle)
Thin Flood Consistency
Use: the flood of a two consistency outline & flood


In the photos above, thin flood uses are: all of the floods! Even for something simple like the Holy cookie, you’ll want a thin flood because the cookie itself is so large.


In the photos above, thin flood uses are: all of the floods! The Kwanzaa cookie uses a two consistency outline and flood, however, the Pride flag and maple leaf are using a thin flood to do a ONE consistency outline and flood. Usually I recommend a thick flood for a one consistency outline and flood, but it CAN be done with a thin flood if you’re trying to do a lot of wet on wet as well.

Visual measuring cue: runs off the spoon easily in a consistent stream
Extra Thin Flood Consistency
Use: flood when doing heavily detailed wet on wet designs (the thinner the icing the more time it takes to crust, so the more time you have to work with it before it dries)


In the photos above, extra thin flood uses are: all of the floods! Extra thin flood consistency is especially useful for a lot of wet on wet, wet on wet on a large cookie and a lot of wet on wet that requires scribe pulls (like the clover and popsicle).

Visual measuring cue: runs of the spoon in a very fast stream
1 vs. 2 Consistency Outline & Flood
Most cookie designs require “flooding” the cookie — i.e. covering the cookie fully in icing with a flat surface that you then add decoration on top of. This base of icing is called the “flood” because it uses flood consistency icing. No matter what the decorating method is to outline and then flood the cookie, but there are two different ways to flood a cookie: 1 consistency outline and flood OR 2 consistency outline and flood.
Most cookiers have a strong preference toward one method or the other. I might be in the minority in that I am totally comfortable doing both and the one I choose to use for a set is usually a combination of the needs of the set/designs and my mood at the time. Not that long ago I preferred 1 consistency because it just seemed easer/faster to me, but these days I’ve been doing more and more 2 consistency because it gives me greater flexibility in design/control over my icing.
1 consistency outline and flood
For a 1 consistency outline and flood, you use ONE thick flood consistency to both outline and flood the cookie. You use a thicker flood because it is just thin enough to settle quite easily but thick enough that it’s not instantly going to fall off the cookie. This is harder to make because there is a small window where the consistency is “just right”.
2 consistency outline and flood
For a 2 consistency outline and flood, you use a thicker piping consistency to outline and then a thinner flood consistency to flood. Sometimes I allow the outline to dry first and sometimes I don’t (it creates a different effect either way).
For beginners and most cookiers in general, I recommend that you always allow the outline to dry because it makes the outline easier to work with and more stable to hold in your flood icing. There is also more flexibility in how thick/thin your piping consistency is and how thick/thin your flood consistency is.
Do I use one or two bags to outline and flood?
Simply put, you need a bag for each consistency.
For a 1 consistency outline and flood, you’ll use one bag as you’re outlining and flooding with the same consistency. It’s just a matter of changing the amount of pressure on the bag.
For a 2 consistency outline and flood, you’ll use two bags: one for the piping consistency and one for the flood consistency.
Which method is best for beginners?
It’s hard to say what to recommend. In my beginner decorating classes I almost always make a 1 consistency because it’s easier to apply. It’s more forgiving in application because you can use a scribe to encourage the icing to the edge and to even out more effectively than you can if you already have a dried outline. But, keep in mind that a 1 consistency can be harder to make. The 2 consistency is easier to make because there is a much wider range of an “acceptable” consistency for the piping and the flood.
Royal Icing Consistencies: FAQs
How do I thin the icing?
After you make the base recipe of icing in the mixer, then transfer it to bowl(s) to hand mix consistencies with either a spoon or spatula. It’s almost impossible to over mix by hand and you’ll have so much more control over mixing the consistencies in a bowl by hand. I know that some cookiers mix consistencies in the mixer, but I just can’t! And don’t recommend it 😉
In the bowl, you’ll want to slowly add water to thin the icing. How much water you’ll need depends on how much icing you’re working with, what consistency you started at, which consistency you’re going to and how humid (or not) your environment is.
Different ways to add water (the dropper and spray bottle methods will give you a lot more control–just make sure you are ONLY using these devices for water):
- Trickle from the tap (this is what I used for year)
- Dropper
- Spray bottle (my personal favorite)
What do I do if I thinned my icing too much?
If you have thinned your icing too much I would caution AGAINST adding back in more powdered sugar. This is for two reasons. One, for royal icing to function properly there needs to be the right balance of meringue powder to powdered sugar. Adding back in more powdered sugar after you’ve already mixed the recipe will mess with this. Secondly, you’re bound to get lumps in your icing that will clog the tip (even though you MUST sift the powdered sugar if you’re doing this, lumps can still happen).
I usually try to have a little extra of the stiff/medium peak icing from the original batch left over so if I thin my icing too much I can add a spoonful of that thicker consistency to fix it. If I don’t have any extra icing to do this with AND if I have only thinned it just a tad bit too far, then in a pinch I will add back some additional powdered sugar (sifted!). This seems to work OK with my recipe in terms of proportion to meringue powder, however I do get lumps sometimes.
How many seconds is your flood icing?
Unfortunately, I do not measure my flood icing with the seconds method so I’m not able to give advice on that.
Can I just use one consistency for everything?
The answer to this is a qualified yes and no: I’d say 90% of cookie designs require more than one consistency.
But, it CAN be done! I know that using just one consistency is so much easier, takes less prep time, and is less overwhelming to tackle (especially for beginners), which is why I make all of my beginner online classes with just one consistency.
Ah, I’m overwhelmed with all the different floods and piping consistencies! Which one do I use??
As an expert cookier I employ all 3 piping and all 4 floods for different purposes, but for most people just make a flood! Any flood. Truly. And a piping consistency! Any one will do.You’ll make it work.
Especially if you’re using a two consistency, I recommend making a piping consistency somewhere between a soft and medium peak, and a flood anywhere in the thick/thin region.
I’m so frustrated I can never get the consistency right! What am I doing wrong?
Ah, I’ve been there! That said, without being in your kitchen with you it’s impossible to tell you exactly what you’re doing wrong. I’d recommend taking notes every time that you decorate so that you know for next time what you need to tweak. Icing is too thin? Add less water next time. Icing is too thick? Add more water next time. Trial and error is the way to go!
When do you color the icing?
When I first started working with royal icing I thought you had to thin the icing first THEN color it. So I spent over an hour trying to color match my blue piping and flood consistencies. WHAT A DISASTER. So I’m here to save you the same headache to tell you: color the icing first, THEN thin it to your desired consistency!
Step 1: Mix icing in the mixer
Step 2: Transfer to bowls by color (i.e. if you need 2 ounces blue soft peak piping consistency and 5 ounces thin flood consistency, then your blue bowl has 7 ounces)
Step 3: Color icing with a spatula/spoon
Step 4: Thin to desired consistency (with a spatula/spoon) and bag as you go (i.e. first thin to a soft peak, then bag 2 ounces, then thin the remaining to a thin a flood, then bag the remaining 5 ounces)
Other posts you might be interested in:
- What Is Royal Icing: A Beginner’s Guide
- My Royal Icing Recipe
- My Cookie Recipe
- How to store royal icing (more detailed instructions)
- Troubleshooting Royal Icing: Common Problems While Cookie Decorating
- How much icing per cookie – coming soon!
- All of my favorite cookie decorating supplies
- Left-Handed Cookie Decorating
- Cookie Decorating Practice Sheets
Sharon
Wednesday 13th of August 2025
Thanks for the great info. In the past, I have had problems knowing the difference in consistencies of royal icing. Your posts have really helped me do a better job and know what to look for. Also. I have taken some of your cookie classes - I love them.
thegracefulbaker
Friday 22nd of August 2025
I'm so glad they've been helpful!!
Joann
Monday 2nd of June 2025
Hi Grace! I am really enjoying your classes and all that I am learning from you!
Question about consistencies and bagging: when I color my icing and allow the colors to develop, the consistency is all over the place and requires a lot of manipulation to return to any level of workable consistency. Is it normal for royal icing to thicken so much in airtight containers or am I doing something wrong? Likewise, if I overthin it when I color it, it doesn’t seem to thicken. Go figure.
Thanks for your help.
thegracefulbaker
Monday 7th of July 2025
Hi!! Sorry I missed this!! If you're taking my classes, definitely better to leave questions on the private class YouTube videos :) for your question... I'm actually not sure what's going on! my guess is you are probably adding way too much food coloring, which compromises the integrity of the icing. I've never heard of icing thickening in airtight containers... I'm sorry I'm not much help here! but again my guess is too much food coloring. any follow up questions, definitely leave them in the private class youtube videos :)
Hannah
Monday 19th of May 2025
I am a visual learner and these visual instructions of what to look for and how the icing is supposed to behave was just what I needed. I made my first cookies (4 dozen circle cookies) and made the thick flood for once consistency outline and flood to be able to fill the cookies quickly and then did soft peak for writing.
Your photo examples and use cases as well as the video being able to see how you made them were just what I needed!
Thank you for the time and effort that you put into this! You made it so easy that I am making a dozen more cookies this weekend!
thegracefulbaker
Sunday 25th of May 2025
oh I'm so glad this post was helpful!!!
Can You Freeze Decorated Sugar Cookies? How To Store Royal Icing Cookies
Tuesday 5th of November 2024
[…] Royal icing consistencies […]
Camilla
Tuesday 22nd of October 2024
Thank you for this post, it is so helpful! Also: I would love it if you had this as a paid ebook. I would purchase it for easy reference (not complaining about the ads, just saying I would happily pay to have a downloadable/ printable version). Cheers.
thegracefulbaker
Wednesday 23rd of October 2024
That's not a bad idea!! I do have some of this info in my class workbooks (https://thegracefulbakershop.com/), but definitely not to the level of detail that's included in my blog posts. I think I would combine my 5 foundational posts on the what is royal icing, icing recipe, consistencies, troubleshooting and cookie recipe. I'm curious, what would you pay for something like that?