I truly believe that the better you get at cookie decorating, the better you just get at troubleshooting royal icing. Royal icing is the most difficult icing medium to work with (in my opinion) because so many different things can go wrong with it during the preparation and the application. The worst part? Often you don’t know anything is wrong until the next morning when the icing is fully dried. Can’t tell you how many times I’ve cried over a fully done set of cookies!


*DISCLOSURE: This post contains affiliate links which means that, at no additional cost to you, I may earn a small commission if you make a purchase from one of my links. I greatly appreciate your support!
Please note: the info below is just the beginning! It is not meant to be a comprehensive list on troubleshooting these various issues. I also plan to do more in-depth posts on topics like cratering and color bleed.
Troubleshooting Royal Icing: Icing Dries Funny
We’ve all been there: you finish a beautiful batch of cookies only to wake up the next morning to find that something about the icing hasn’t dried correctly. Step one to troubleshooting royal icing!
Icing doesn’t dry completely
This could be for a few reasons:
- The first is that oil has been introduced to the icing. Oil and royal icing do not mix! Most cookiers wipe their mixers down with white vinegar or lemon juice before mixing their icing to prevent this. I personally never do this and have never had an issue like this, but I think it’s because my icing recipe has lemon juice. **Also make sure not to use extracts with oils.
- The other reason could be that you’re in an entirely too hot and too humid environment. Royal icing needs a nice temperate environment to dry completely and/or at the usual pace.
- You have placed the cookies in an airtight container BEFORE they are dry. Yes, you heard that right! You should NOT put royal icing cookies in an airtight container until they’re completely dry. The icing needs to be exposed to the air to dry. This usually takes about overnight (approximately 8 hours).
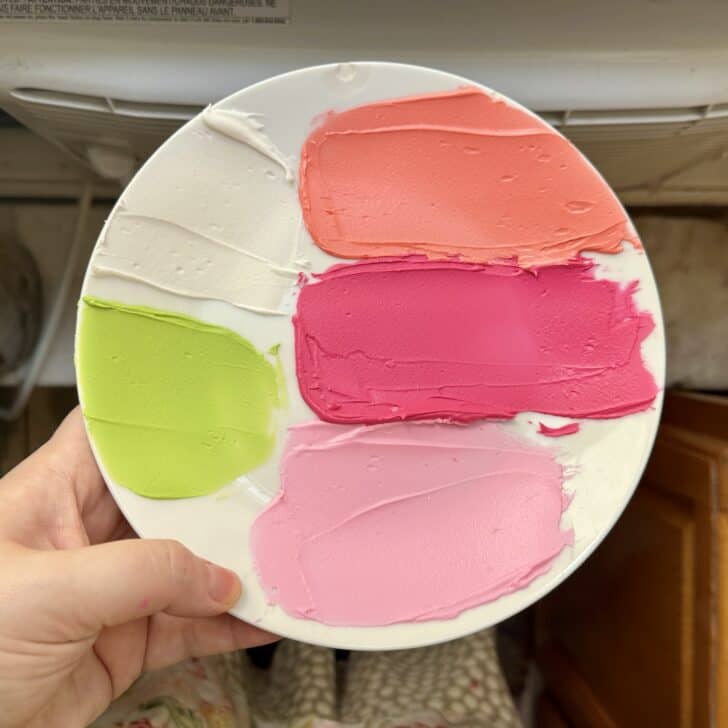
As a sort of precaution, I always like to put a little blob of each color of icing on a plate while I’m mixing/bagging the icing. This has a chance to dry a bit by the time I start decorating. If the icing hasn’t developed a crust by that point I know that something is off with my icing. I can’t remember the last time this has happened to me, but it gives me great peace of mind anyway to do this!
Icing dries crumbly
This could be for two reasons:
- First is that the icing was overmixed. We’re talking for 10+ minutes in the mixer.
- The second is that WAY too much food coloring was added to the icing. Like a ridiculous amount (this used to happen to be with black and red icing before I started using The Sugar Art Master Elites).
Icing dries with a matte/flat finish
Usually, royal icing will dry with a bit of a sheen on its own, but it is definitely encouraged by the movement of air around them. You can achieve this by directly using a fan on the cookies while they dry or using a dehydrator.
Spot on the surface
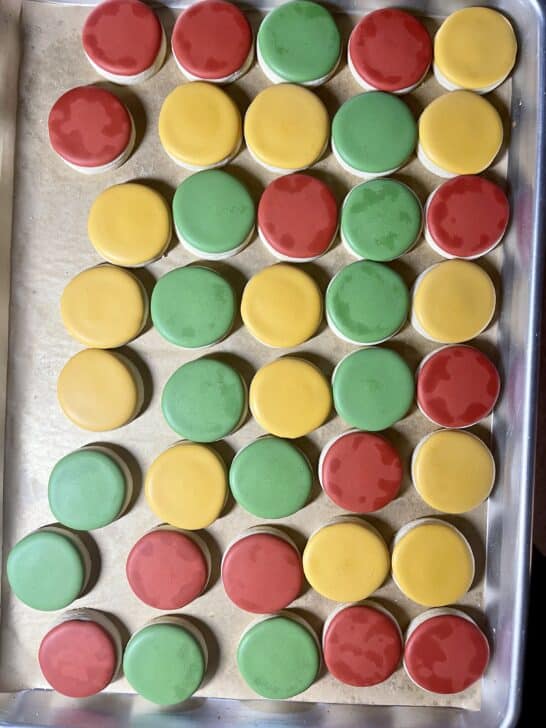
This is caused by butter bleed. This means that the butter (fat) from the cookie has seeped into the icing, leaving dark spots on the surface.
I’m not entirely sure why this happens, but I do know it always happens if I leave my cookies to dry in the sun. This also tends to happen to me when I try to bake and decorate my cookies on the same day (not sure why!). So I always bake my cookies at least the day before I decorate.
Click here for a more detailed post on butter bleed.
Cracks on the surface of the icing

This I find usually happens when trying to move cookies before they’re totally dry. This will particularly happen when the icing has crusted on top but is still quite wet underneath. When moving your cookies before dry be careful to keep them as level as possible to prevent this.
Troubleshooting Royal Icing: Consistency Mishaps
Perfecting royal icing consistencies is one of the hardest things to do with the medium. Even for me, as an expert cookier, I don’t always get the consistency right. (And, yes, I still get over floods!)
Icing over floods
This is such a common issue and I think it still even happens to advanced cookiers (happens to me!). The easy way to explain this is that your icing is too thin or that you put too much icing on, but it’s a bit more complicated than that. Getting just the right amount of flood icing on the cookie is all about knowing how much pressure to apply on the bag based on the thickness of your icing and the size of the opening of your bag.
Piping detail melts together

Quite simply this means that your piping consistency icing is too thin. Please see note below about thickening icing that is too thin.
Flood icing doesn’t dry smooth/flat
This can happen for a few reasons:
- First is likely because your flood icing is too thick and/or you didn’t do anything to help the icing settle (e.g. use a scribe to jiggle the cookie or encourage the surface of the icing to settle)
- It’s also possible that even though the consistency of your icing is perfect, you worked too slowly. Working with flood consistency in particular is often a race against the clock because you want to flood your cookie before the icing starts to crust.
If your icing is too thin I would caution AGAINST adding more powdered sugar after mixing the icing. That’s because it will mess with the proportions of your liquid vs sugar vs meringue powder. You need a certain amount of meringue powder ratio for your icing to behave/dry correctly. If your icing is WAY too thin you might need to make a new batch. Sorry, happens to all of us! I usually like to have some extra stiff or medium peak icing leftover from a batch just in case this happens.
Color Bleed
Color bleed is when one color kind of bleeds into the next once dry. This can happen because your icing is too thin and/or has too much food coloring, among other reasons. Here are some ways to prevent color bleed:
- Don’t use too thin of a flood consistency
- Use high quality food coloring
- Allow the colors to develop (icing color gets darker over time)
- Color your white icing
- Use a dehumidifier/AC if your decorating environment is humid
- Don’t use too much corn syrup (if that’s included in your recipe)
- Do not store in the fridge
- If you’re going to store in the freezer, know how to properly do it
Check out this blog post for more detailed information on how to prevent color bleed.
Troubleshooting Royal Icing: Craters
Craters naturally happen when royal icing dries (something about the weight of the sugar/meringue powder vs the liquid), it is just more noticeable in a small surface. Craters can range from just a gentle dip/dimple in the icing to an actual hole in the surface of the icing. There are a few ways to prevent them (although please note I haven’t found any one method that is fool-proof!):
- Use the thickest icing possible for your application: the thicker the icing, the less like it is naturally to crater
- Pipe a squiggly of piping consistency icing in the area before you flood (this gives some extra structural support to the flood icing)
- Pop the cookies in a dehydrator for about 15 minutes immediately after piping the area to encourage the icing to crust faster
- When tackling a second layer of icing, flood that second layer when the base layer has crusted JUST enough (this is usually around 30 minutes of drying).
- There’s also a new technique going around when preventing craters in a second layer of icing: poke holes in the base flood (under the area you’ll cover with a second layer of icing). You can even do this when the first layer flood has completely dried! I’ve personally never done this, but I’ve heard plenty of cookiers have great success with this method!
Troubleshooting Royal Icing: Air Bubbles
Air bubbles are caused when air is introduced to the icing. There are a few ways to prevent this (but also know that if you have just a few air bubbles in your flooded cookie you can always pop them with a scribe!):
- Do not mix your icing for too long or at too high of a speed. I don’t like to go above medium speed (4) on my stand mixer.
- Before you bag your flood icing, allow the icing to sit in the bowl for a few minutes. The air bubbles will rise to the surface and then you can pop them gently with the surface of your spoon/spatula.
- Once bagged, you can do two things:
- Before closing the end of the bag with a clip, twist the end of the bag and hold tightly and then spin the icing around like a lasso. I know, sounds crazy! I’ve only had one mishap. But I find this to be the best way to remove air bubbles.
- If the lasso technique scares you, you can do the “love tap” method of whacking the closed bag with the palm of your hand 🙂
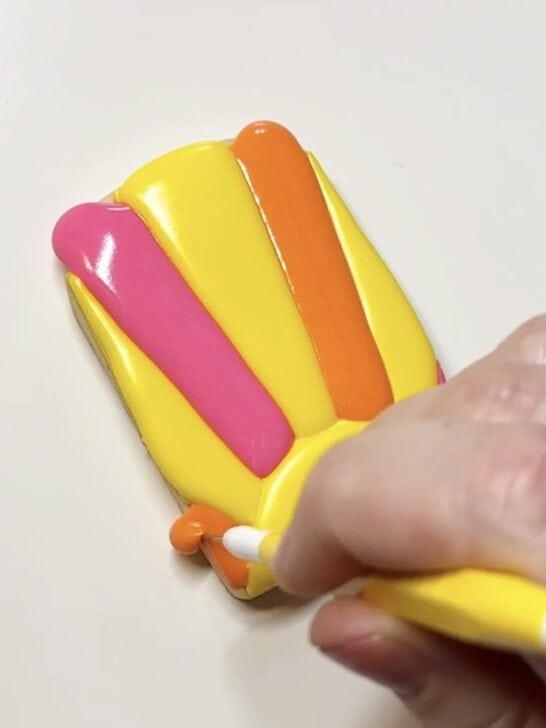
- Once you get to decorating, if you see an air bubble in your icing… simply pop it with a scribe! You can only do this while the icing is still wet, so work quickly.
Want to try cookie decorating?
Try out one of my online cookie decorating classes!
Other posts you might be interested in:
- What Is Royal Icing: A Beginner’s Guide
- My Royal Icing Recipe
- My Cookie Recipe
- Royal Icing Consistencies
- How to store royal icing (more detailed instructions)
- Troubleshooting Royal Icing: Common Problems While Cookie Decorating
- How much icing per cookie
- All of my favorite cookie decorating supplies
- Left-Handed Cookie Decorating
- Cookie Decorating Practice Sheets
Maria
Sunday 11th of January 2026
My issue is the consistencies start out great and then after about an hour they have thinned. Sometimes by the time I finish decorating I’m using my piping as the flood and the stiff as piping and it doesn’t hold much of a shape. What am I doing wrong?
thegracefulbaker
Saturday 28th of March 2026
hmmm... no icing should be thinning that much just a few hours after decorating. this sounds very odd to me, as in there must be something off about your gauge of the thickness of the icing before bagging? I would try making them a lot thicker than you think is needed, and see if that works? if not, working in a really hot/humid environment will make the icing thin faster, but not so fast that it doesn't hold it's shape after one hour...
Cathy Garza
Friday 12th of December 2025
1st time cooky decorator. Cooky recipe is great. Followed icing recipe to the tee (measuring in grams and using timer) The icing came out so stiff after adding 2 T more of lemon juice. Too thick to even flood. Could my meringue powder be old, even though there is no best by date?
thegracefulbaker
Sunday 21st of December 2025
hi!! so the icing goes through an evolution... it's start out thick like paste and then fluffens up. you need to mix it for the minutes listed in the directions to make sure you mix it to that stage :) hope that helps!!
Holly Gage
Sunday 16th of November 2025
If the hole in the pipping bag is too small, will the frosting come out squiggly? I'm guessing my squiggly lines are the result of icing too thick and the hole in the piping bag is too small.
thegracefulbaker
Thursday 20th of November 2025
hi! so, yes, that can be the reason for squiggly lines! it can also be because the tip was not cut cleanly and there might be an edge of the plastic that the icing is catching on as it comes out. another reason for squiggly lines is inconsistent pressure when piping. hope that helps!
Ellen
Saturday 28th of June 2025
Sometimes my bae coat dries with waves in the icing. How can I prevent that?
thegracefulbaker
Wednesday 2nd of July 2025
hello! the "ripple" effect you can see on icing typically happens because there wasn't enough airflow while the icing was drying... royal icing needs to be completely exposed to air for 6-8 hours for it to completely dry. cookies should be on a flat surface exposed to air. even if your cookies are on baking sheets, if you are stacking them on top of each other that can result in not enough air flow. so I wouldn't stack sheets while the cookies are still drying :) hope that helps!
Tina
Sunday 27th of April 2025
Butter bleed is a myth. I used to get those spots on transfers. It is caused by oversaturation of your color and color separation. I bake and decorate the same day with no issues.
thegracefulbaker
Sunday 4th of May 2025
Good to know :)